Partnering with Registered Apprenticeship
Part 1 (continued): Your Training Model
Now that you've thought about how your organization currently trains workers to learn new skills, let's model it!
A great way to model a process is to create a graphical concept map or a flowchart. Here is an example of what one looks like. Let's use a free online concept mapping tool called Gliffy to make a model of how your organization currently trains or obtains trained workers. Here's how:
Step 1: Start a New Model
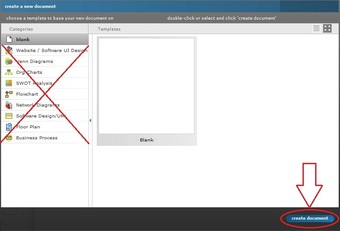
Go to Gliffy (this link should open in a new browser window). Click on "Create Document" in the lower right corner. DO NOT choose a template from the list on left; just use the blank default.
Step 2: Draw Shapes
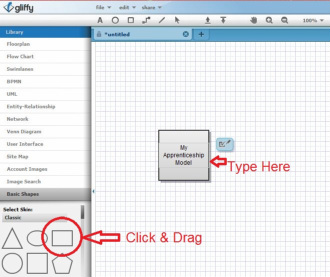
Click on one of the shapes in the lower-left corner, and drag it out to the middle of the screen. Double-click inside the shape until you see a cursor. You can now type words inside the shape.
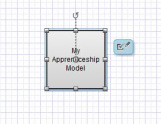
To move the shape, click it and drag it around the screen.
To make the shape bigger or smaller, click it until you see the sizing boxes (as shown in bottom illustration) on the edges of the shape. Click and drag a sizing box to change the size of the shape.
To make the shape bigger or smaller, click it until you see the sizing boxes (as shown in bottom illustration) on the edges of the shape. Click and drag a sizing box to change the size of the shape.
Make more shapes, type words into them, and move them around the screen until you have a flowchart that represents your organization's training model.
Step 3: Add Connecting Lines
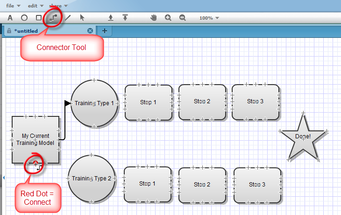
When you're done adding shapes, draw lines in between them to show the model's flow. To draw lines, click on the "Connector Tool" in the top menu bar.
You will now see hash marks appear at the edges of all of your shapes. Hover your mouse over one of the hash marks until you see it turn into a red dot. Click on it, and drag your line over to another hash mark on another shape. Release your line when you see the red dot appear on the other shape. Your shapes are now connected. When you move one shape, your connecting lines will move with it.
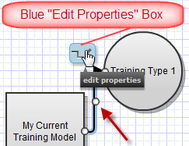
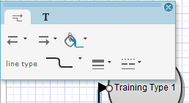
To format a connecting line (for example, if you want it to be an arrow instead of a line), click on the line. The line will now have grey sizing dots on it, and there will be a blue "Edit Properties" box near it. Click on the blue "Edit Properties" box. Choose your line type, color, etc., then click anywhere to go back to your model.
To move or delete a connecting line, click on the line until you see the grey sizing dots. Click on a dot to move that end of the line, and drag it to where you want it to go. To delete the line, click on it and press "delete" on your keyboard.
Draw connecting lines between the rest of your shapes on your model.
You will now see hash marks appear at the edges of all of your shapes. Hover your mouse over one of the hash marks until you see it turn into a red dot. Click on it, and drag your line over to another hash mark on another shape. Release your line when you see the red dot appear on the other shape. Your shapes are now connected. When you move one shape, your connecting lines will move with it.
To format a connecting line (for example, if you want it to be an arrow instead of a line), click on the line. The line will now have grey sizing dots on it, and there will be a blue "Edit Properties" box near it. Click on the blue "Edit Properties" box. Choose your line type, color, etc., then click anywhere to go back to your model.
To move or delete a connecting line, click on the line until you see the grey sizing dots. Click on a dot to move that end of the line, and drag it to where you want it to go. To delete the line, click on it and press "delete" on your keyboard.
Draw connecting lines between the rest of your shapes on your model.
Step 4: Save Your Model
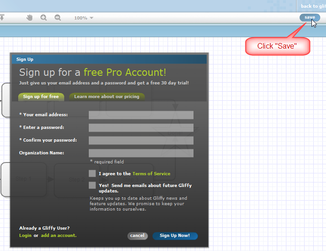
When you're done drawing connecting lines, your model is done! Click "Save" in the upper right corner to save your model. In the pop-up box that appears, enter your email address and password, then click "Sign up Now!" to create a free Gliffy account.
Note: The "Pro" account is free for 30 days, then reverts to a "Basic" account which is free forever.
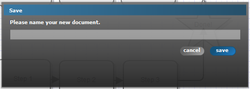
A new box will now appear, where you can type a name for your model. Click "Save" when done.
Note: Leave your model open in its browser window for now. We're going to come back to it later on in this lesson.
Note: The "Pro" account is free for 30 days, then reverts to a "Basic" account which is free forever.
A new box will now appear, where you can type a name for your model. Click "Save" when done.
Note: Leave your model open in its browser window for now. We're going to come back to it later on in this lesson.
Great! Hopefully now you've clearly modeled how your organization currently trains its workers to learn new skills. Now we're going to learn about the Registered Apprenticeship model for skills training. Click "Next" to continue.

NEXT
