Partnering with Registered Apprenticeship
Part 3: Modeling Partnerships with Registered Apprenticeship
Now that you fully understand both your own and the Registered Apprenticeship training model, let's explore how your organization can partner with RA to enhance its training model. To do this, we're going to use the model that you created of your organization's current skills training process, and compare it to the Registered Apprenticeship model for skills training, to help you envision some clear opportunities for partnership.
First, let's take a look at your model again. Go back to the model of your organization's current skills training process that you created using Gliffy (if you've closed it, go to Gliffy > File > Open > Select Document Name and click "Open"). Keep your model open.
Now, let's take another look at the RA model (scroll down to the bottom of the model and use the slider bar to see the entire diagram).
Now that you have both models, you can compare them side-by-side. How do the two models intersect? What are the commonalities between them? What are the differences? Are there any places that you see overlap, or similar training processes? Let's use Gliffy to model the commonalities between the two systems.
You can do this in whatever way makes sense to you. Some suggestions:
Example 1
You could add text or lines to your current model, perhaps in red, to show points of overlap or opportunity. To do this:
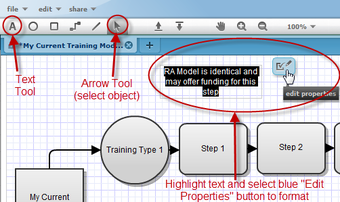
- In your Gliffy model, click on the Text Tool (the capital "A" button) in the top toolbar. Click anywhere on your model, and begin typing.
- To change the color of the text, highlight it and click on the blue "Edit Properties" button that appears to the right of your text. Select the new size, font, or color for your text, then click anywhere on the screen to return. Once you change the color of your text once, all subsequent text will automatically be formatted the same way until you change the format settings again.
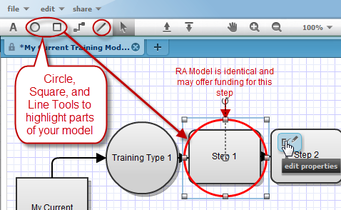
- You can also use the line tool to draw lines to your new text, or you can use the circle/square tools in the top toolbar to draw shapes around parts of your model. As before, once you draw a line or a shape, click on the blue "Edit Properties" button that appears to the right of your new figure, and choose a new color or line type for your shape.
- To move items around or make them bigger, click on the Arrow button on the top toolbar, then click-and-drag or resize the items you'd like to move.
- When you're done editing your model, click "Save" (in the upper-right corner) to save your changes.
Example 2
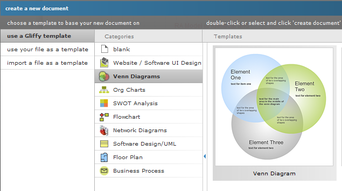
You could make a new model, perhaps a Venn diagram, to show the commonalities and the differences between your current training model and the RA training model. To do this:
- Go to File > New > Choose "Venn Diagrams" > Choose a template that most closely represents how you would like to make your model, then click "Create Document."
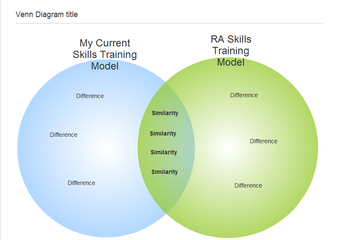
- Using the template, double-click on the words to edit or delete them, or make new words or shapes as shown in Example 1, above. The goal is to show the similarities and differences between your current skills training model and the RA skills training model. Note: Since we're only dealing with two training models, it may be helpful to delete the third Element on the Venn diagram template.
- To move items around or make them bigger, click on the Arrow button on the top toolbar, then click-and-drag or resize the items you'd like to move.
- When you're done editing your model, click "Save" (in the upper-right corner) to save your new model.
Great! Now you've visually explored and modeled the similarities and differences between your organization's current model for training skilled workers, vs. the Registered Apprenticeship model for training skilled workers. Click "Next" to continue.

NEXT
